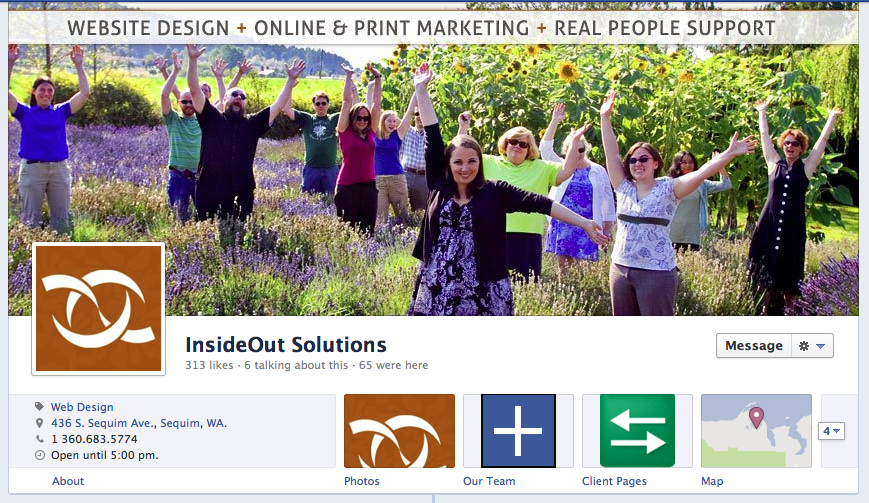
Insideout Solutions Facebook Timeline
In the wee hours of the morning on Wednesday, Feb 29th, (yes, leap-day) Facebook had initiated project Launch Timeline for Pages. There were a few lucky pages that were allowed to update in advance on this date, which was fortunate for the rest of us, so we could see what was on the horizon. The Today Show, Manchester United, and Red Bull, to name a few, were the earliest forerunners.
Some of you may know nothing about Timeline, having never enabled it on your personal profile. For those of you who did make the switch, you’ve got a leg up in using this cinematic interface.
As a Page admin you’ll have some questions, including the biggies like, “What about custom tabs?” “How will fan-gating (calls to action with rewards for liking a page) be effected?” “Will I be able to set a default tab for potential/new fans to see?”
Well lets get into this a bit, but first lets look at all the great things that the new Timeline for Pages will bring you:
- A nice wide canvas (aka: Cover) upon which to greet fans and tell your story: The new 851 px wide cover image (free from overt promotion calls-to-action (CTA) or advertising, is sensational. Consider it your new Welcome or Landing Tab. (851 x 315 pixels)
- A smaller profile image that nests in the lower left of the cover image. This may be a great place to display your logo or brand. (displays at 160 x 160 pixels)
- With those teeny tiny app thumbnails you’re used to in the left side bar, well, now you can upload and replace those little guys with your own custom image. Very nice indeed, giving you a bit more branding control.
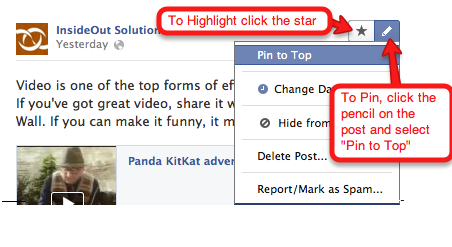
- If you’ve got a status update that you’d like to have fans see at the top of your page, you can now make it “sticky” by pinning it. The lasts for seven days. After that, you’ll need to re-pin it to the top again if you want it to remain visible front and center.
What is changing, and what you might pine for:
- You may no longer set a default landing tab (now both fans and potential fans will land on your Wall and see that sweeping, gorgeous Cover image we mentioned earlier).
- The photostrip of five images across the top is gone.
- The profile image, once allowed a maximum of 180 x 540 pixels now displays at 160 x 160 px (though keep in mind that you must upload a profile image with a minimum width of 180 px).
- Tabs have been moved from the left sidebar (under the profile image on your old Page format), to just under the Cover image on the right. Now here’s the most important item: in your Page Timeline, a total of four tabs are visible, and in the coveted first position is the immovable Photos tab.
- The new layout is split into two columns, making it a bit more confusing to follow the flow of the conversation from the Page and fans.
All-in-all, there are a lot of great new features with Timeline for Pages. The forums, blogs and fan pages are chock-a-block full of discussion about the discoveries as well as pros and cons of the new layout. We’ll hit the highlights here.
Timeline Rollout:
When does the Timeline change become mandatory?
Facebook states that “On March 30, 2012, all Facebook Pages will get a new design.” Given this fact, you’ve got some time to prepare your Page.
Can I test drive the new Timeline for Pages?

Take a tour of your Timeline Page
You can preview your page, as well as upload and view test cover and profile image. You can see the blue “Preview” button at the top of any page you Admin. take the tour, and if not ready to click “Publish Now,” you can elect to click “See your old design” any time. (Phew).
What you can do as the Admin for the Page:
You can now view admin items including Page Insights, likes and comments right at the top of your Page.
If you are the admin of multiple pages, you may now view one or all of them here to save time and work efficiently.
What about that “Edit” button? How do you Edit the page now?

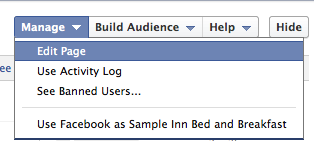
At the top right click the Admin panel button
Then click the Manage tab, and choose Edit page. You’ll arrive in the back end admin area you’ve always seen.
Editing the “About” section next to the profile image:
In the same Edit Page area, click “Basic Information: You’re given approximately 160 characters for display.
If you’ve got a physical address, you most likely have a map and marker indicating where your business is located, as well as your phone number. This info comes from Bing Maps (Bing and Facebook are buddies), just understand that you may have to go through the process of claiming your Place Page in order for the “About” info to appear.
The Look and feel of your Page Timeline.
The layout for Timeline for personal profiles is nearly identical to Pages.
We have a tutorial and free downloadable Photoshop template for designing your personal Timeline. It offers some great tips and resources.
All the measurements (in pixels) under one roof for your designing ease:
- Cover Image: 851 x 315
- Profile image: 160 x 160 (must upload an image that’s at least 180px wide) (This will also be your comment thumbnail, so design accordingly)
- App tabs: 111 x 74
Adding a Cover image:
Click “Add a Cover” button . Once you’ve uploaded the image, you’ll be given a chance to reposition it if it’s larger than 851 x 315. Click Save when you’re done. Facebook has created a page on the rules regarding advertising on the cover image. You may want to familiarize yourself with the terms.
In at nutshell Cover images may not contain:
- Price or purchase information, such as “40% off” or “Download it at our website.”
- Contact information, such as web address, email, mailing address or other information intended for your Page’s “About” section.
- References to user interface elements, such as Like or Share, or any other Facebook site features.
- Calls to action, such as “Get it now” or “Tell your friends.”
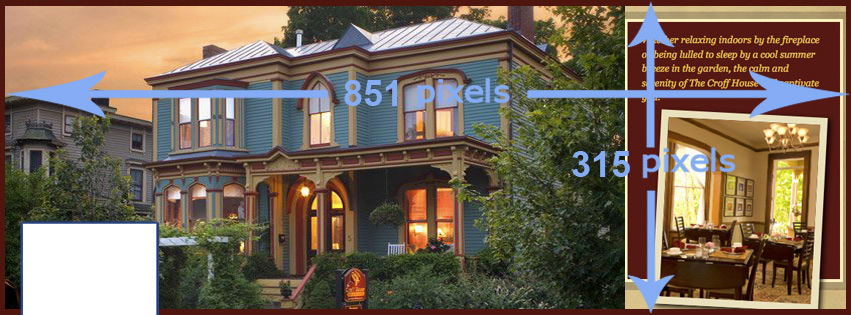
Facebook Timeline Cover for Pages
Customizing the Tab Thumbnails, and managing tabs:
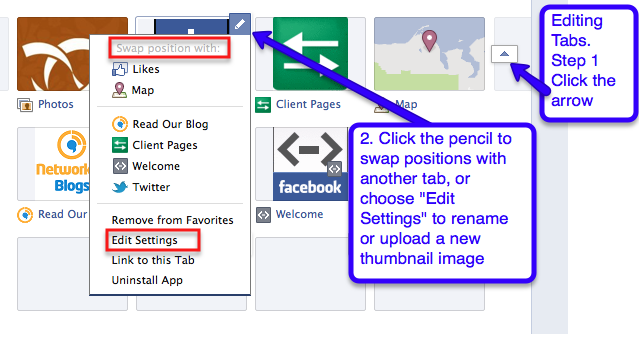
After the static “Photos” tab, you may not only reorder the remaining tabs that you’ve enabled (from Maps, to Notes, to custom Welcome or Deals), but you can also change the image thumbnail. Fans will see four tabs. The remainder are hidden until the little down arrow is clicked. Fans can see a maximum of twelve tabs, admins will be able to see them all.
To change the tab thumbnail image:
- Click: Down Arrow to the right of the last App
- Click the pencil
- Click “Edit Settings”
- Next to “Custom Tab Image” click “Change”
Ok now onto the fun part: Managing your Page:
Posting to Your Timeline page:
- Some of the great things you can do include Pinning a post to the top of your Wall (Under the cover image, of course). Pinning will last for seven days. You can re-pin it after that time to keep in at the top.
- Highlight a status update by allowing it to span the width of both columns. Keep in mind that at this time, you cannot both Pin and Highlight the same post.
We’re very excited about the new Timeline for Pages. Give it a test spin on your page, enable it on your personal profile and play with it for a while, prep your new cover image and profile, then switch it up on or before March 30th.
Get on the Internet Marketing Weekly Feed
Subscribe to Internet Marketing Weekly from InsideOut Solutions.
