Questions from clients about how Google+ authorship and website publisher should be used continue to pour in. They’ve read that they should be using Google+ to leverage more visibility in Google search as part of inbound marketing via search engines. There are many unknowns (Google never gives the game away entirely) but there are several things we recommend at this point to get more out of your content marketing on Google:
Claim Authority for Your Website Content with Google+
![]() Google is putting a lot into Google+ to make it relevant to and competitive in the social media market. One way they are doing that is to reward participation in the website publisher and authorship features with a potential increase search visibility of your content marketing efforts. Google continues to dominate with 2/3 of the internet search market. Therefore, I recommend participation by businesses (publishers) and content writers (authors) seeking to maintain and increase their chances of growing their search visibility by building authority for their targeted content.
Google is putting a lot into Google+ to make it relevant to and competitive in the social media market. One way they are doing that is to reward participation in the website publisher and authorship features with a potential increase search visibility of your content marketing efforts. Google continues to dominate with 2/3 of the internet search market. Therefore, I recommend participation by businesses (publishers) and content writers (authors) seeking to maintain and increase their chances of growing their search visibility by building authority for their targeted content.
If and when you’re ready to add Google+ to your business’ social media outlets, and start reaping the benefits of increased visibility, here are the steps:
Step 1: Prepare Your Website
To take full advantage of your Google+ efforts at increasing the effectiveness of visibility in Google search, the very first thing you need to do is make sure your website is prepared to receive the authoritative credit you are trying to earn with Google and its users.
For WordPress websites designed by InsideOut Solutions, this is fairly straightforward (if you don’t have a WordPress website, contact us for assistance with this update):
Establish Your User Authors for Website Pages & Blog Posts
For each user of your WordPress website and blog that you want to establish Google+ authorship:
 Set user to display their full name (first name followed by last name) publicly.
- Make sure the user has an email address using your website domain name (e.g. john@mybusinessdomainname.com) if possible (it will make things easier). We can help our clients set up email accounts and aliases as needed to accomplish this.
- Make sure each page and post of your website is credited to the proper author. If you currently have multiple people posting under the same user, you will want to to set up a user for each person who is an author and then reassign the credited content to the proper author.
Check Your SEO Plugin
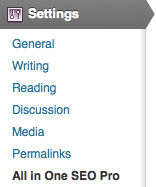
Not all SEO plugins for WordPress are created equal. InsideOut used a modified form of the All In One SEO Pro plugin in the past but we have moved to using the WordPress SEO plugin by Yoast for new websites as it offers, among many other improvements, a way to easily establish the Google+ publisher status for websites. To find which plugin your website has, look at the left sidebar of your website’s administration area.
Have WordPress SEO? You’re good to go for setting up Google+ authorship and website publisher!

See All In One SEO Pro? Contact us for an upgrade!
If you see the WordPress SEO by Yoast logo you’re all set to easily establish the your Google+ publisher credentials.
If you see All in One SEO Pro under Settings in the left sidebar then you should request an upgrade to the WordPress SEO plugin via an email to updates@insideout.com (typically costs $40) – we will migrate you to this plugin and you will also be able to take advantage of its easy-to-use SEO tools for your pages and blog posts.
Step 2: Have or Create a Google Account, Google+ Profile and Business Page
 It is critical that the owner of the business take control of their business presence on Google. This ensures that the owner retains primary authority with Google regarding their business. If you have already done this, skip to If you have a Google account. Otherwise, create a Google account without Gmail, using the personal email address from your website.
If you have Google account and it’s not set up with your business email address, be sure to add that email address. This will make the the Google+ authorship process easier.
 Create a Google+ Profile
If/when you have a Google account set up, the next step is to add a Google+ profile. If you already have a Google+ profile, skip to the Establish Google+ Authorship section below.
- Use your full name (first name and last name)
- Upload a quality “headshot” photo as the profile picture (this is needed for establishing Google+ authorship).
Establish Google+ Authorship of Your Website & Blog Content
- Login to your Google+ personal profile
- Go to https://plus.google.com/me
- Copy the URL from your web browser address bar
- Login to your website administration area
- Open your user profile
- Paste the URL in the Google+ entry and click “Update Profile”
- Go to and follow the instructions at: https://plus.google.com/authorship
- Add your website title and URL to your Google+ profile’s “Contributor to” section – simply follow Google’s instructions beginning with point #2 at https://support.google.com/webmasters/answer/2539557
Create a Google+ Page for the Business
 Once you have your Google+ Profile set up, click the Home icon and select Pages to start the process of setting up a Google+ page for your business.
- Locate by phone number
- Select the existing Google listing or add the business if needed
- Adjust map location if necessary and confirm info
- Make sure you link the Google+ page to your website
Note: Use the Google+ page as you would Facebook, by engaging Google+ users and enticing comments and shares. The only thing Google does not allow is promotions. Manually post links to your blog posts with a custom introduction. Ask questions. Have a perspective worthy of comment. Future posts on this blog will deal with best practices for businesses to use their Google+ page.
Establish Google+ Page as Publisher of Your Website
- Click Google+ tab
- Select to show author for home page
- Paste the Google+ page URL in the Google Publisher Page entry and click “Save Settings” button
- Cick the Home tab
- Paste the Google+ page URL in the Google Publisher Page entry and click “Save Settings” button
Step 3: Have or Create a Google Account & Google+ Profile for Each Author and Set Up Their Authorship
Each author of your website will need to have a Google account and Google+ personal profile in order to participate in the authorship feature. Simply have each author follow the Google account, Google+ profile, and Google+ authorship steps above as needed.
What About Ghostwriters?
Google has not released any official statements on the use of ghostwriters and how it relates to Google+ authorship. I personally recommend crediting actual authors rather than claiming content written by somebody else for your business for the following reasons:
- Should the ghostwriter stop writing for you, it will be difficult at best to replace the their unique “voice” (which they should for effective content marketing). If you cannot author subesequent posts using that “voice,” then you will lose credibility for the cited author.
- Having the name of an author that gains a readership via their other blogging efforts tied to your own blog will only help in gaining recognition.
- Google may decide to crack down on ghostwriting down the road. How they would and what the effect would be are unknown, but why take the chance?
Step 4: Verify Your Setup Is Working

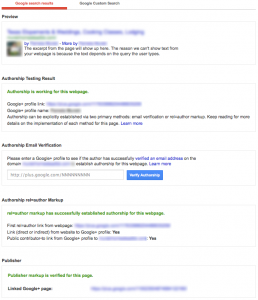
Click the image to see a larger view of successful structured data testing of Google+ authorship and website publisher.
Use the Google Structured Data Testing Tool to confirm that everything is working.
- Enter the URL of your website and click “Preview”
- Look for green status messages throughout for
- Authorship Testing Result
- Authorship rel=author Markup
- Publisher
- The following should also be present – verify all are correct:
- Preview
- Site Title
- [Website Address] by [Author Name] – more by [Author Name]
- Authorship Testing Result
- Google+ profile link: [URL of author’s Google+ profile]
- Google+ profile name: [Author Name]
- Authorship rel=author Markup
- First rel=author link from webpage: [URL of author’s Google+ profile]
- Public contributor-to link from Google+ profile to [Website]: Yes
- Publisher
- Linked Google+ Page: [URL of business’ Google+ Page]
- Preview
You may then test your other authors by submitting author-specific URLs (e.g. a blog post from each author).
Step 5: Add Google+ Page Branding Graphics
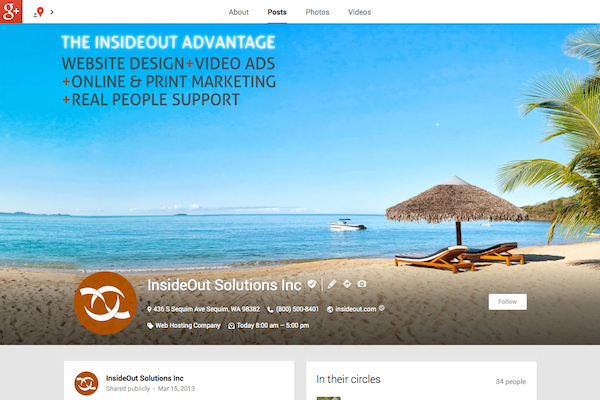
Email sales@insideout.com to request branding graphics for your Google+ page. We will create a custom profile picture and cover photo using the design elements of your website. This service costs $120 and creates a consistent “look and feel” between your website and Google+ page. See an example at the InsideOut Solutions Google+ page (scroll up to see the full cover image). Additional samples are available on request.
Need Help with Your Google+ Authorship Questions?

Claim your content on Google+ to gain authority for it with Google search.
InsideOut Solutions is here to help you take advantage of the benefits of Google+ authorship and website publisher features. From setting up domain-based email addresses for you authors, to technical support with your WordPress website and Google accounts, to successful verification of all aspects using the Google Structured Data Testing Tool, InsideOut’s technicians will help you establish authority with Google. Simply send an email to sales@insideout.com to get started.
What are your experiences with or expectations for Google+ Authorship?
Let’s hear your thoughts about Google using its social media platform as a way to establish content authority and increase the search visibility of online authors and publishers.


