Internet Marketing Weekly: Give tours of your area attractions to your blog readers by creating custom Google maps for your blog posts
Are you surrounded by world-class hiking trails, ski resorts, or trout streams? Is your business in the midst of a museum or historical district? Do you want to show the world how close you are to a famous monument or national park?
Put yourself—alongside these amazing local attractions—on the map.
Using Google Maps, you can create custom maps, using your own map markers and driving or walking routes, which you can add to your blog posts. Your map can be as simple as a single scenic drive or as detailed as a collection of your favorite area wineries, complete with routes and scenic overlooks along the way.
To help get your creative juices flowing, here are some ideas for blog posts that could benefit from including a map:
- Scenic driving tour
- Birding hotspots
- Art walk
- Historical walking tour
- Wine trail
- Day trip itinerary
[cf name=javascript]
Here’s how:
Create a custom Google map
1. Go to Google Maps at maps.google.com.
2. Sign in to your Google account by clicking the “Sign in” button in the upper-right corner of the page.
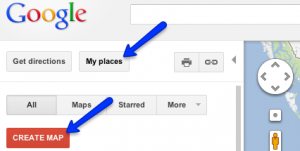
3. Click the “My places” button in the upper-left corner of the page, then click the red “CREATE MAP” button.

To create a custom Google map for your blog, go to Google Maps and log in with your Google account.
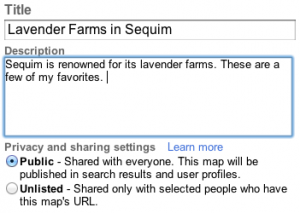
4. Give your map a name and description, then make sure the “Public” option is selected.

Give your Google map a title and description.
5. Click the “Save” button above your map’s title. If the button says “Saved” instead of “Save,” Google has automatically saved your map. It does this at regular intervals.
[cf name=javascript]
Add map markers
There are two ways to add markers to your map. You can either use the search bar to find businesses or locations that appear on Google Maps, or you can add your own custom locations. It’s almost always a good idea to add your own business to your maps along with surrounding attractions.
Add markers for existing locations
1. Use the search bar to search for a location on Google Maps. You can search for a business (“Purple Haze Lavender”), a natural feature (“Mt Olympus, Washington”), an address (“436 S Sequim Ave, WA”), or other locations.
2. Click on the red map marker for your location. When the info bubble appears, click “Save to map” at the bottom of the bubble. Choose your new map, then click “Save.”

Look for businesses on Google Maps and save them to your own map.
3. To add another location, do another search. Otherwise, you can view your map by clicking the “View map” link in a yellow box that appears at the top of the page.
Look for the orange box at the top of the screen to view your map.
Add markers for custom locations
If Google Maps can’t find the location you have in mind, or if you simply want to mark a particular spot, you can add custom locations to your map.
1. Click the marker icon at the top of the map between the hand icon and the line icon.

Choose the map marker icon to add your own locations to your map.
2. Your cursor will become a map marker. You can still scroll across the map and zoom in and out. Click on the map to “drop” the marker onto the map. If you drop the marker in the wrong place, drag the marker to correct it.
3. When you drop the marker, an info bubble appears. Give your marker a title and a description.
Edit your markers
No mater whether you’ve added a custom marker or used an existing location, you can change the marker’s title, add a description, and change the shape of the marker icon.
To edit the title and description of a marker, click the marker. When the info bubble appears, type your own title and description. If you want to use bolding, links, bulleted lists, or other formatting in your description, click the “Rich text” link. When you’re finished, click “OK.”

Add links, bulleted lists, and other formatting by clicking the “Rich text” link above your marker description.
To change the shape of the marker icon, click on the marker. By default, the markers are blue upside-down raindrops. In the marker info bubble, click the marker icon in the upper-right corner. Click on the icon that best depicts the location, then click the “OK” button at the bottom of the info bubble.

You can change the shape and color of the map marker.

Google offers several dozen icons to choose from.
Delete map markers
To remove a map marker, click the marker. Click the “delete” link in the bottom-left corner of the info bubble.

You can also delete a map marker.
Add lines, routes and shapes
In addition to map markers, you can also add lines, routes and shapes to your map. Lines and routes might come in handy to describe how to get to an attraction or where a hiking trail leads, and areas can indicate a broad area like a national park or historic district.
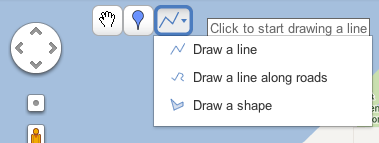
Click on the line icon to the right of the marker tool in the upper-left corner of your map and choose a tool.

Draw a freehand line, draw a line along roads, or outline a shape.
With the Draw a line tool, you can draw a segmented line freehand across your map. To begin drawing, click on the map. Click on a different place to “anchor” the line and continue drawing. To end the line, either click on the last anchor point or on the very first point.

Draw a line to indicate a hiking trail, walking tour route, or other off-road excursion.
With the Draw a line along roads tool, the line you draw will “snap” to the nearest roads. You can click on the map to add anchor points so that the line follows a specific route instead of the shortest possible route.

Use anchor points to specify your route along roads.
You can also use the search bar to save driving directions to your map. Search for directions in the search bar as if you were looking for driving directions, then scroll down to the bottom of the directions. Click the “Save to My Maps” link, then choose your map and click “Save.”

Instead of drawing a driving route, you can search for directions and save that route to your map.
With the Draw a shape tool, you can outline a many-sided shape to indicate an area.

Indicate an area using the Draw Shape tool.
Edit your lines and shapes
You can give a title and description to each of these lines and shapes in the same way as you do with map markers.
You can also choose the color and transparency of the lines and shapes. To do this, click the line or shape. In the info bubble, click the color swatch in the upper-right corner.

You can change the color, width, and transparency of lines and shapes.
In the “Edit shape style” bubble, click the color swatches to choose new colors. You can also choose the width of the line and the opacity of the color. A low opacity number makes the line more transparent, and a high number makes the line more visible. For shapes, you can also choose the fill color and the opacity of the fill color.

The higher the opacity number, the darker your line or shape will be.
Add your map to a blog post
Ideally, you’ll want your map to appear in your blog post as an interactive map instead of as a static picture of a map or as a link.
It might not always be possible to paste your map directly into your blog post. For security reasons, some blogging platforms like WordPress (and therefore Inndx) are picky about the type of code they allow in blog posts. A Google map can look like malicious spam code, in which case your map might be removed from your post. Fortunately, WordPress offers workarounds that allow you to include your map. (Inndx clients, please ask us at InsideOut about the best way to add a map to your blog.)
If you aren’t able to add an interactive map to your post, another option is to take a screenshot of your map and add that picture to your post. You can then link the picture to your map on the Google Maps site.
Here’s how to add your map directly into your blog post:
1. Click the chain link icon above your map title. In the pop-out box, click “Customize and preview embedded map.” The Customize window shows you a preview of what your map will look like on your blog page.
2. Choose the map size. Your map should be big enough so that your readers can easily see all of your markers, but make sure the map fits within the width of your blog.
3. Below the map size options is the map preview. You can zoom in, zoom out, and drag the map around.
4. When you’re satisfied with your map, copy the HTML code at the bottom of the window and paste it into your blog post.

Copy the map code and paste it into your blog post.
Happy mapping!
Get on the Internet Marketing Weekly Feed
Subscribe to Internet Marketing Weekly from InsideOut Solutions.
[cf name=javascript]


